Knowing How to Write a Check Is Still Important!
/Today’s kids will be tomorrow’s adults and we keep on hearing that so many young adults don’t have a clue how to write a check. We’re here to help! For the next goal your child achieves in FamilyMint, rather than whipping out the debit or credit card at the store, take your checkbook with you and make it a learning opportunity. You could print this tutorial out too to let them follow along visually and review later.
Step 1 – Start with the Date
Write today’s date in the upper right corner of the check.
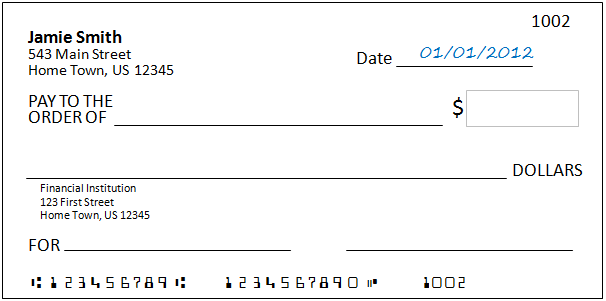
Step 2 – Payee
The payee is who you are paying. In other words, it’s who you are giving your money to. Write the company or person’s name on the line next to “Pay to the Order of”. If you don’t know exactly what to write in here, ask the person you are paying. Don’t sign the check without writing this in first! If you leave this blank, anyone can write in their own name in there and easily steal from you.

Step 3 – Amount
This is when your hands may start to get sweaty! You need to write in the amount of your hard-earned cash that you are handing over to the person receiving the check. That really is the best way to think about it… writing a check is the same as giving them real cash from your real checking account.
First write in the amount you are paying in the box next to the Payee. Start far over to the left so the person receiving the check, if they’re untrustworthy, can’t write in a “1” and change the check from $87.42 to $187.42!
Then, on the line below Payee, write in amount again, but this time using words. For example, “Eight-Seven and 42/100”. This is read as Eighty-Seven dollars and 42 cents. Most checks will already have “DOLLARS” preprinted on them so you don’t need to write that again. Also, draw a line after the 42/100 all the way to the right so again nobody could write anything extra in there.

Step 4 – Signature
The last step is to sign the check. Your signature needs to match the one your financial institution has on file, so no letting kids help with this step!

Step 5 – Enter a Memo (Optional)
This step is not required, but if you’d like to have a reminder of why you wrote the check, write it next to “Memo” or “For” toward the bottom of the check. Note you'll only be able to see this memo later on if you're able to access images of your canceled checks from your financial institution.

Step 6 – Update Your Check Register
Hey, wasn’t Step 4 was the last required step? No way! You need to update your check register so you can track that the money is now gone… and you don’t try to spend it again. If you don’t do this, as well as your overall balance, you could end up with fees from your financial institution for a bounced check (which could be as high as $25 or $30) as well as insufficient fund fees from the merchant you were writing a check to. This is costly!
Here’s an example check register entry for the check we just wrote at the grocery store:

That’s it! ! It’s actually kind of soothing to whip out the old pen to write a check and give my texting thumbs a rest.
Extra Credit – Those Funny Numbers at the Bottom of the Check
We covered almost every part of a check. But what about those numbers at the bottom? These are your routing transit number, which identifies your financial institution, your account number, and your check number. There may be other numbers at the bottom including the amount of the check if the check is created electronically, but this covers the basics.

